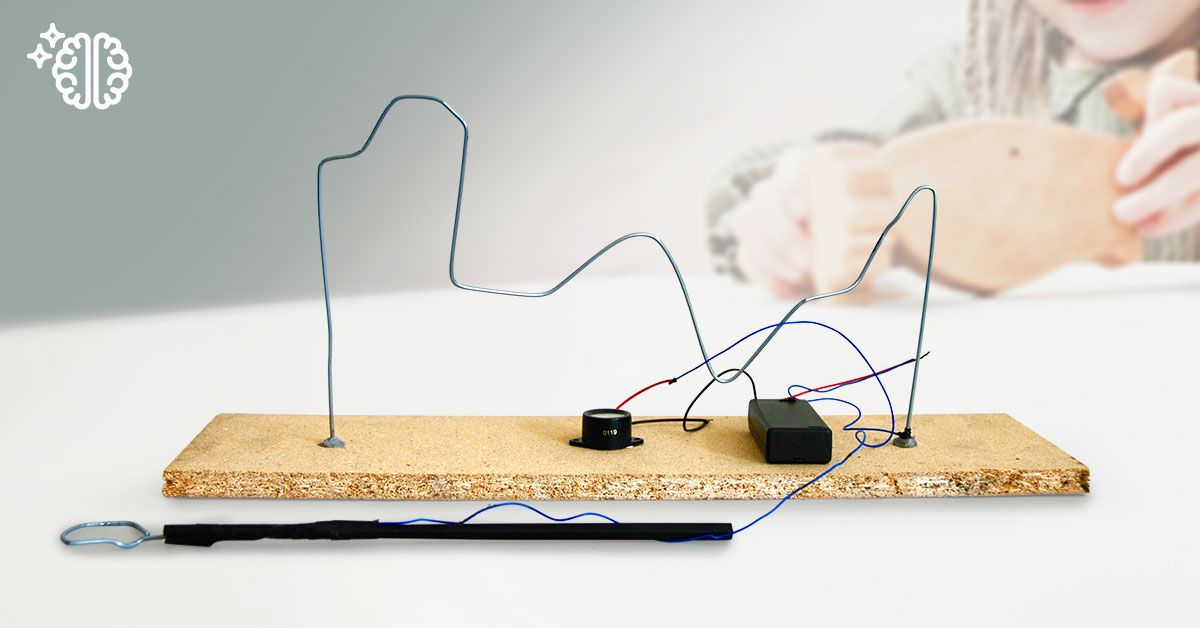
With just a few parts, you can make a great game that will test your skill and build your understanding of how electrical circuits work.
Making a skill tester is a great way to pass the time and learn a little more about how electrical circuits work. And when you’re done, you’ll even get the chance to test how steady-handed you are!
What you will need
‣ 2AA switched battery enclosure (Part#: PH9280 $3.95)
[https://www.jaycar.com.au/2aa-switched-battery-enclosure/p/PH9280]
‣ Two AA batteries (Part#: SB2424 $1.95)
[https://www.jaycar.com.au/aa-alkaline-eclipse-batteries-pk-2/p/SB2424?pos=14&queryId=aba359138a7deb5be5ff0154e5e660b9&sort=relevance]
‣ Buzzer (Part#: AB3452 $4.95)
[https://www.jaycar.com.au/mini-buzzer-5-15v/p/AB3452?pos=12&queryId=551cb80372054817b4de4b5a02722581&sort=relevance]
‣ Two pieces of electrical wire – one 20cm and 60cm (Part#: WH3032 $4.95)
[https://www.jaycar.com.au/economy-breadboard-jumper-kit-5-colours/p/WH3032]
‣ Soldering iron and solder (Part# TS1651 $27.95)
[https://www.jaycar.com.au/20-130w-soldering-iron-starter-kit/p/TS1651]
OR… wire glue (Part#: NM2381 $9.95)
[https://www.jaycar.com.au/wire-glue-9ml/p/NM2831]
‣ Liquid electrical tape (Part#: NM2836 $19.95)
[https://www.jaycar.com.au/liquid-electrical-tape-tube-black/p/NM2836]
‣ Insulation tape (Part#: NM2806 $3.95)
[https://www.jaycar.com.au/6-rolls-insulation-tape/p/NM2806]
‣ Mini glue gun and glue (Part#: TH1997 $12.95)
[https://www.jaycar.com.au/mini-glue-gun/p/TH1997]
‣ Piece of wood – any offcut that is about 1.5cm thick and 40 by 15cm wide
‣ A wire coat hanger or similar wire offcut
‣ A piece of dowel about 25cm long. If you don’t have a dowel handy, a skewer or chopstick will work just as well
‣ Drill and thin drill bit (Part#:TD2508 $19.95 & TD2010 $11.95 & TD2406 $12.95)
[https://www.jaycar.com.au/3-6v-rechargeable-lithium-ion-screwdriver-kit/p/TD2508?pos=18&queryId=86e4f99f3016debcdb557a30072c0398&sort=relevance]
‣ Side cutters (Part#: TH1897 $14.95)
[https://www.jaycar.com.au/precision-127mm-angled-side-cutters/p/TH1897?pos=3&queryId=e05fd68880274738e313597c1003a5e9&sort=relevance]
‣ Pliers (Part#:TH1984 $24.95)
[https://www.jaycar.com.au/7inch-bull-nose-pliers/p/TH1984?pos=5&queryId=56e090d2571d249c6d8890292d26207e&sort=relevance]
How to make the game
Step 1
Carefully using your side-cutters, strip 1cm of insulation from the ends of the wires on the buzzer and battery enclosure. Grab the other 2 bare wires and remove about 2cm of insulation from the ends of both lengths of wire.
Step 2
Unwind the coat hanger so that you have a single length of stiff wire. Be careful as the wire can spring back. Cut a 10cm piece from one end using the pliers and set it aside. Then straighten out the long piece to remove the biggest bends and kinks in the wire. Bend the wire 90 degrees, 15cm from each end so that it looks like a ‘U” shape. Then add some bends through the center section.
Step 3
Drill two small holes approximately 30cm apart into the wood. The drill bit you use needs to be small so that the coat hanger wire fits tightly in the hole. The holes should go most of the way through the wood but not all the way.
Step 4
Put the ends of the bent coat hanger wire into the holes in the wood. If the holes you drilled are a little loose, you can use some Blu tack® to ensure the wire is secure.
Step 5
Wrap the end of the shorter wire (approx. 20cm) you stripped in Step 1 around the bottom of the coat hanger wire and secure it with solder or wire glue. Wait a couple of minutes and then apply some liquid electrical tape and allow that to dry for five minutes.
Step 6
Take the black wires coming from the battery enclosure and the buzzer. Using either a soldering iron or wire glue, connect the two wires. Once the solder is cool, coat the connection with some liquid electrical tape and allow it to dry for five minutes.
Step 7
Take the piece of coat hanger wire you set aside earlier and bend it so there’s a circle at the end with a diameter of about 3cm. Leave a small opening in the circle.
Step 8
Taking the longer length of wire (approx. 60cm), wrap one end of the exposed wire you stripped earlier, and secure it to the end of the loop you made either with solder or wire glue. Then apply some liquid electrical tape and allow it to dry for five minutes.
Step 9
Secure the loop and wire to the dowel (or skewer/chopstick) using insulation tape, creating a wand.
Step 10
Connect the red wire from the battery enclosure to the other end of the short wire you connected in Step 5 using either solder or wire glue, and then cover the connection with liquid electrical tape. Connect the wire coming from the wand to the red wire coming from the buzzer.
Step 11
Install batteries into the enclosure. Then secure the buzzer and battery enclosure to the wood using the glue gun. When you glue the battery enclosure down, ensure you can access the power switch and easily change the batteries.
Playing the game
Once you turn the power on, the buzzer will sound whenever the loop at the end of the wand touches the coat hanger on the base. Challenge your friends to see who can get furthest & fastest along the skill tester and take the title for “Steadiest Hand in the Land”.

